Setting Up a New DaDesktop Server
Deploying a DD Node on GTHost or Hetzner Servers
Here are some notes to guide you through deploying a DaDesktop Node (Server) on a bare metal Linux server from GTHost, Hetzner, or similar providers. Keep in mind, these instructions may shift as the installation and deployment script evolves.
We'll assume you've already purchased a server and plan to install Ubuntu Jammy 22.04. If you have multiple disks, consider using RAID0 (striping) to boost disk performance — just define this during the 'installimage' process in Rescue mode if you're on Hetzner.
Getting Ready: Installing the OS on a GTHost or Hetzner Server
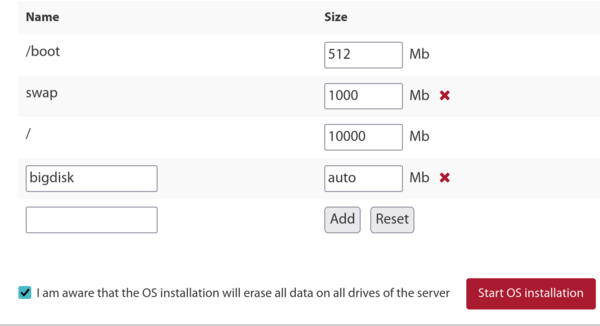
- Start by SSHing in with the root credentials you were given. Run 'apt update' and 'apt upgrade' to bring all packages current, then use 'apt autoremove' to strip out anything outdated before moving on.
- On Hetzner, the server boots into rescue mode first, so you’ll need to set your distribution preferences, software RAID (like mdm), filesystem (xfs), and IPv4 settings before you reboot and upgrade. It’s usually fine to stick with the default small ext4 partitions for /boot and /boot/esp — don't use xfs there — and skip swap entirely. For the / partition, go with xfs and let it claim the remaining space.
- If you’re on LeaseWeb or another provider, you'll have to switch the main / filesystem from ext4 or btrfs to xfs. While the notes below serve as a rough guide, getting the / partition to use xfs is trickier than simply designating a /bigdisk with xfs — filesystem changes have to be made from outside the OS, since you can't safely alter / while it’s mounted.
-
Creating an xfs filesystem is easiest with your provider’s tool if they offer one. Otherwise, from the rescue system you can run:
mkfs.xfs -f /dev/mdx (this formats with xfs, using -f to force overwrite).
Keep in mind we no longer set up a separate /bigdisk partition; it’s now just a directory under / instead. - Once created, mount it with mount -t xfs /dev/mdX / from outside the OS, or use your provider’s portal.
- If you were still using a /bigdisk partition (which is no longer standard), add 'defaults,nofail 0 0' in /etc/fstab so the server can still boot even if that partition fails to mount.
- Run systemctl daemon-reload to let systemd pick up the changes in /etc/fstab.
- Then mount -a to verify your partitions, and confirm with df -T.
-
Reboot the server.
Running the DaDesktop Installation Script
- SSH to the server, e.g., svr@xxxxxxxxx
- Next, fetch the DaDesktop install script:
- curl http://npg.io/d > d
- Now, it’s time to upgrade the base OS from 22.04 to the latest Ubuntu release — currently 23.10 (Mantic) or, soon, 24.04 (Noble).
- The easiest way is to use the update-os script found at /apps/dadesktop_npnode_deploy/modules/00-upgrade-os. This replaces the apt sources list from 'jammy' to 'mantic' (or 'nautic'), letting you upgrade in one shot rather than multiple steps. Normally, skipping releases isn’t recommended, but the tiny number of installed packages makes it safe.
-
Should DNS stop working during the distribution upgrade (as we’ve seen once), fix it by running:
rm /etc/resolv.conf ; echo "nameserver 8.8.8.8" > /etc/resolv.conf - If you want a custom hostname (like lo33uk.npg.io), set it now — maybe you’re reusing an old name. Reboot if needed for the change to take effect.
- Then, run the main installation script for the DD Node. Consider using tmux to guard against a dropped SSH connection. From the directory where you downloaded the script, execute 'bash d'.
- Watch the on‑screen logs for errors. The script will automatically add your server’s IP to the NP access list, but you might need to wait a minute or two for the whitelist cron job to update before you can proceed.
- Keep an eye on the script’s progress, and address or report any issues that pop up.
- Afterward, run the cleanup script at /apps/dadesktop_npnode_deploy/modules/00-cleanup; it strips away many unneeded packages and rolls back a few.
- Execute /apps/zabbix-agent/services/test-all.sh to spot any remaining problems.
- Purge any unmaintained packages with apt purge, and delete any broken links you find.
-
Finally, reboot and verify everything works.
Verifying the DD Node After Installation
- Check the new DD server entry in the DaDesktop GUI and run tests with, for example, test TPAPI.
- Set the start and expiration dates for the server within DaDesktop, and assign it to a datacenter if necessary.
- Verify the new server’s operation in Zabbix and resolve any alerts.
- Confirm functionality by adding a Standalone instance to the server and running it.
- Add the server to the appropriate datacenter if it hasn't been already.
- Optionally, set up billing rules for the new node.
- If needed, copy operating system templates to the server.
- Finally, notify the trainer or coordinator if this server is earmarked for a specific course.
Enjoy!